This Week's Assignment
The assignment this week was to make a 3D mould and use it to make a fibre composite part.
I've not been looking forward to this week due to a chronic lack of inspiration.
Of all the past Composite week pages I have looked at, the only really cool one I've seen is Sam Calisch's boat. That, however, was a little beyond what I hoped to achieve.
I decided to keep things simple and use burlap and epoxy. I cheated for this week and waited to watch the review before I started. Right at the last moment, Anders Haldin spoke about making a frisbee. I like Ultimate so figured I might as well do the same.
Oh, and as an aside, Frisbee is a brand name. I'm not making a Frisbee. I'm making a "flying disc".
Technique Testing: Two Part Moulds
I started out doing a simple test piece, or "coupon" as Neil likes to call it. I cut out 5 pieces of burlap by hand, mixed the epoxy (we had Axson 816 in the lab) and just used two pieces of wax as my "mould". I forgot to grab some clamps from the workshop before it got locked up for the night so I had to improvise some weight.

I used Meguiars Mirror Glaze #8 as my release agent. I never actually read the instructions though and just slapped on one coat. It turns out you're supposed to do at least three and buff in between each. The result of my laziness was some of the wax sticking to the epoxy. Harmless, but not the best for aesthetics.

The piece was pretty strong and the surface finish on both faces was OK. The edges were a mess but I hadn't tried to be neat with them.
Technique Testing: Vacuum Bagging
Next up I wanted to test the vacuum bagging technique. Instead of doing another flat coupon, I thought I might as well try something disc shaped. The easiest thing to use as a mould was...a disc!
Since vacuum forming typically gives a better finish on the mould side, I opted to use the disc as a female mould i.e. make my composite inside the disc. I wanted my disc to be as close to 175g as possible, as that's the "official" weight of the discs used in tournaments. My previous coupon had been 5 layers with a surface area of 180mm x 80mm, and weighed 66g. Doing some back-of-the-envelope calculations, I figured that a 5 layer disc would end up weighing a rather heft 325g. Since my disc didn't need to be all that strong, I opted to reduce the number of layers of burlap to three. This gave me an estimated weight of 195g. Since vacuum bagging typically uses slightly less epoxy than the two layer mould method, I figured I was going to be pretty close to my 175g target.
I cut the burlap on the laser (50/90/500 on our 40W Epilog Mini). To avoid folds I added some slits to the outer rim. No fancy modelling and surface unfolding - I just did it roughly by eye. The inside of the disc was treated with the wax release (properly this time) and I used cling film with some manual holes added as my bleed layer.
My original plan was to use an old towel as the breather layer, but according to the link on the class website, burlap can be used as a breather. Instead of wasting a towel, I just used some scrap burlap I had from when I was testing the laser settings.
After the layup was complete it was into a cheapo vacuum bag from Asda.

I was a little worried that the holes in my cling film were too big and that the breather layer would become so saturated with epoxy that it would be inseparable. 16 hours and a bit of brute force later, and I was left with my disc-in-a-disc.

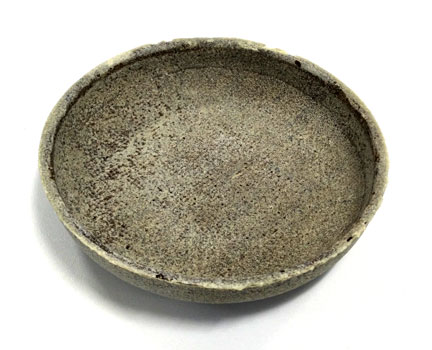
Due to the slight lip on the disc it was quite a challenge getting the composite out. With the aid of a chisel, I managed to get the part out unscathed.

It was a waste of time trying to get the cling film bleed layer off. It just wasn't going to happen. The edges needed some pretty serious clean up too, so I used a Gerbil cutter to trim them off. I did some final sanding of the edges with a Dremel and was left with my finished test disc.

I was reasonably happy with the outer surface finish, but the edges were quite variable in thickness due to the overlaps in the burlap. It was also clear that I hadn't exactly done the best job spreading the epoxy evenly, especially around the edges. I did, however, do pretty damn well with my weight estimates. Final weight came in at 172g. Pretty much spot on!
I've not had a chance to try throwing it yet. I can already tell the rim is a little on the shallow side but I guess this was just a tester after all.
A Two Part Mould
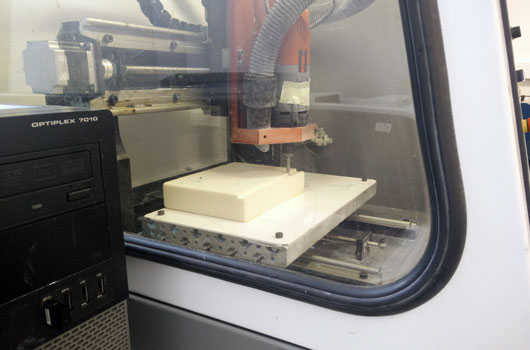
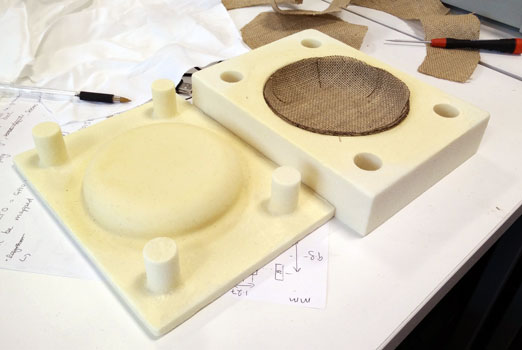
Based on my experiments I figured a two part mould would give me the best chance of a good finish on both surfaces. My biggest limitation was the size of foam block we had, so instead of a full size disc, I made a model for a disc golf marker disc. I used a low density foam and milled it on the Denford MRC40 with a 1/4" bit. The foam is so easy to cut that I ran the machine at maximum speed.
Once I had cut both the positive and negative parts of the mould, I gave it four coats of release wax. I went a bit overboard with the wax because I was worried the foam would stick to the epoxy. I cut out some more jute on the laser and did a dry layup to make sure everything looked OK.
Happy with the dry run, I mixed up more epoxy and did the wet layup. This time I was working during normal lab hours so I was able to get into the workshop and get some real weights!
The Result
Well even being as liberal with the release wax as I was, I hand't expected the low density foam to survive. It didn't.
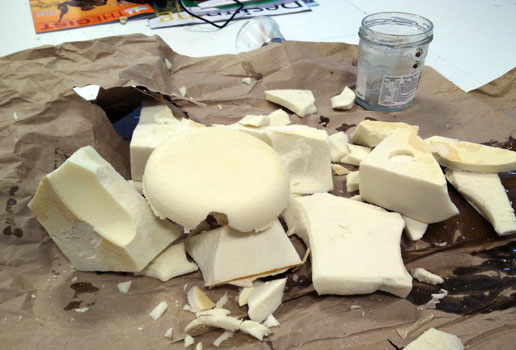
Even though I was trying a two part mould to get a good finish on both surfaces, I ended up getting a pretty bad finish instead! The foam ended up sticking to the epoxy and resulted in the part having a sandy appearance.
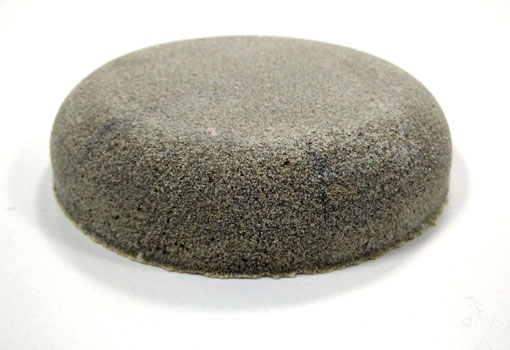
Downside, I didn't get the surface finish I wanted. On the plus side, I now have an excellent method for making indestructible sand castles. Maybe I'll go troll some means kids on the beach.
Get The Files
- This zip has the Inventor and STL versions of the mould, as well as the CorelDRAW cut file for the jute.
Comments
comments powered by Disqus